How to start growing Marijuana – Quick guide
 Growing Marijuana might sound like something that requires in-depth knowledge and a lifetime of practice but bottom line, it’s a plant, its gonna grow if you plant it, just how well is where a little thought, time and effort comes into play as well as the obvious equipment, which can range from simple basics you can pick up at your local garden centre to specialist products that can be purchased from one of the seed banks and shops that you can find here at Cannabis Owl. Growing your own cannabis can be cost effective for those who want or need a regular supply, and having the benefit of never running out. Also you are in charge of quality control so you know where it came from, how it was grown and if done right you can get a superior product, plus we all know psychologically its sure to taste better as you will feel so proud you grew it!
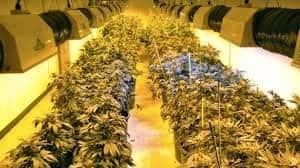
Step 1 -growing space
Choose your growing space, first step is to make sure you have enough light, as good lighting will impact your yield, when possible a place that is getting 8 or more hours of direct sunlight is perfect, but life is not, so getting some bulbs set on timers would be a good idea, for better results. Fresh air is also important, with a little air movement if possible. If you are growing outdoors you will have more available sunlight as long as your seeds choice can take the natural temperature of the climate you live in. Ideas of growing spaces are, garage, balconies, spare bathroom, a closet, a spare room and fab purchases such as grow tents (best option) and in all these places you can make your own or buy suitable grow boxes.
Step 2 – medium
Look into the different growing mediums available and choose which one you want to go with that suits your budget, environment and Marijuana seed choice. So the most common medium would be soil, its cheap, and gives you greater tasting buds, other options are Inert matters such as coco coir, vermiculite, promix or perlite, which are faster growing than soil, and then there is hydroponics which give you the fast growth as well as higher yields and a stronger more potent bud, so its all about what you can afford, and what outcome you want, but you have to bear in mind you might spend a little more but you might reap a better reward from it.
Step 3- Temperature
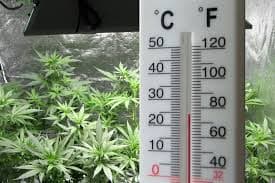 Temperature is important, don’t go choosing a seed that isn’t going to flourish under the conditions you can supply, so with buy a suitable seed, or invest in the proper equipment to ensure that you give it the temp it needs. You need to make sure that if you have chosen to purchase extra lighting that it is or isn’t giving off the required heat you need. Plants tend to like room temperature (20-30 degrees celcius) and never to drop to freezing. Humidity needs to be kept an eye on also especially if you chose a seed that is prone to mould or fungus.
Step 4 – Nutrients
Nutrients can be purchased and you can play around with how much you need, its recommended that you start off with less than is recommended in some pots and more in others to see if you are getting a superior product, otherwise you are just wasting time and money.
Step 5 – hydration
 PH correct hydration. Each seed and growing environment requires a different amount of hydration, so make sure you are giving it the correct amount of water at the right PH level. For example soil would require a PH between 6-7 while hydro prefers 5.5-6.5. Maintaining the right levels will prevent the leaves starting to show signs of nutrient deficiencies as you will have ensured the roots are happy and absorbing at optimum levels. PH levels are super easy to adjust with products aptly names “PH up” and “PH down” so you really need to be an idiot or heavily stoned to mix up which one you need. Note: don’t garden when stoned.
Step 6 – Time
Time. Have patience and give it the right time as just a little extra can give you far better rewards, this applies to growing time, where you can achieve a fatter sticker marijuana bud, but also to drying time as if they are dried correctly you can actually prevent some of the side effects such as headaches and anxiety, in some seeds, so its worth waiting it out a little, plus if you have a nice little stock you don’t need to rush things.
December 12, 2016